This document is for the following HP printers.
HP DeskJet Ink Advantage 4535 All-in-One printer
HP ENVY 4523 All-in-One printer
HP OfficeJet 4658 All-in-One printer
HP DeskJet Ink Advantage 4536 All-in-One printer
HP ENVY 4516 All-in-One printer
HP OfficeJet 4655 All-in-One printer
HP ENVY 4520 All-in-One printer
HP DeskJet Ink Advantage 4676 All-in-One printer
HP DeskJet Ink Advantage 4538 All-in-One printer
HP OfficeJet 4652 All-in-One printer
HP ENVY 4513 All-in-One printer
HP OfficeJet 4654 All-in-One printer
HP ENVY 4511 All-in-One printer
HP OfficeJet 4650 All-in-One printer
HP ENVY 4525 All-in-One printer
HP DeskJet Ink Advantage 4675 All-in-One printer
HP ENVY 4526 All-in-One printer
HP ENVY 4527 All-in-One printer
HP OfficeJet 4657 All-in-One printer
HP ENVY 4522 All-in-One printer
HP ENVY 4524 All-in-One printer
HP DeskJet Ink Advantage 4678 All-in-One printer
HP ENVY 4528 All-in-One printer
HP ENVY 4512 All-in-One printer
HP OfficeJet 4656 All-in-One printer
HP ENVY 4521 All-in-One printer
Replacing HP Printers Ink Cartridges
- Turn on the printer.
- Add plain white paper to the printer.
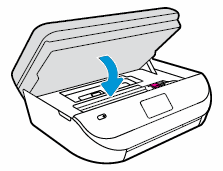
- Grasp the handles on both sides of the printer slowly, then lift the ink cartridge access door.
- The carriage starts moving towards the center of the printer.
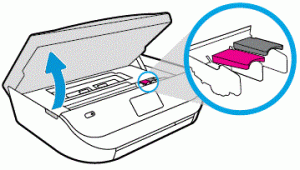
Example: Opening the ink cartridge access door
- Wait until the carriage is idle and silent before you proceed.
- To release the ink cartridge, lift the lid on the ink cartridge slot, then gently push the lid back until it stops.
- Gently pull up on the ink cartridge to remove it from its slot.
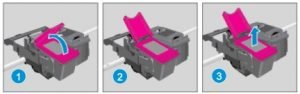
1. Lift the lid – 2. Gently push the lid back – 3. Pull up on the ink cartridge
- Unpack one of the new ink cartridges. Be careful when touching the black plastic on the ink cartridge.
- Gently remove the plastic tape from the ink cartridge.
NOTE: Do not touch the copper-colored contacts or ink nozzles. Do not replace the protective tape on the contacts. Using these parts can result in ink failure and poor electrical connections.
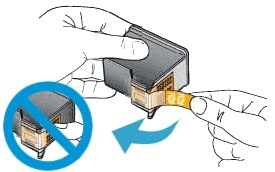
Example: Removing the copper electrical tape
- Hold the cartridge by its sides with the nozzles toward the printer, then gently slide the ink cartridge into the slot.
- Close the cover on the cartridge slot to secure the ink cartridge in place.
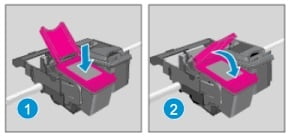
1. Insert the ink cartridge – 2. Close the lid
- Close the ink cartridge access door.
Example: Closing the ink cartridge access door.
- Wait for the alignment page to fully eject from the printer.
NOTE: Before a print job, the printer automatically extends the output tray extender. Do not push in the output tray extender until the print job is complete.
- Lift the scanner lid.
- Place the alignment page print side down on the scanner glass.
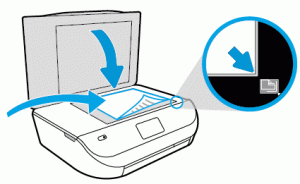
Example: placing the page on the scanner glass
- Close the scanner lid, then touch OK.
For detailed information, please visit the HP Official Site